OAuth Authorization Code Flow
The OAuth 2.0 authorization code grant type can be used with the Hyperproof APIs to authenticate and authorize users to make requests. When the authorization code flow is used, users of your app will first be asked to log into Hyperproof. After logging in they will then be prompted to authorize access to their Hyperproof data. Once authorization has been granted, your app will receive a code that you can exchange for an access token.
Generally, the interaction between a Client (your app), a Hyperproof user, Hyperproof's Authorization Server and the Hyperproof API will look similar to the flow shown in the image below:
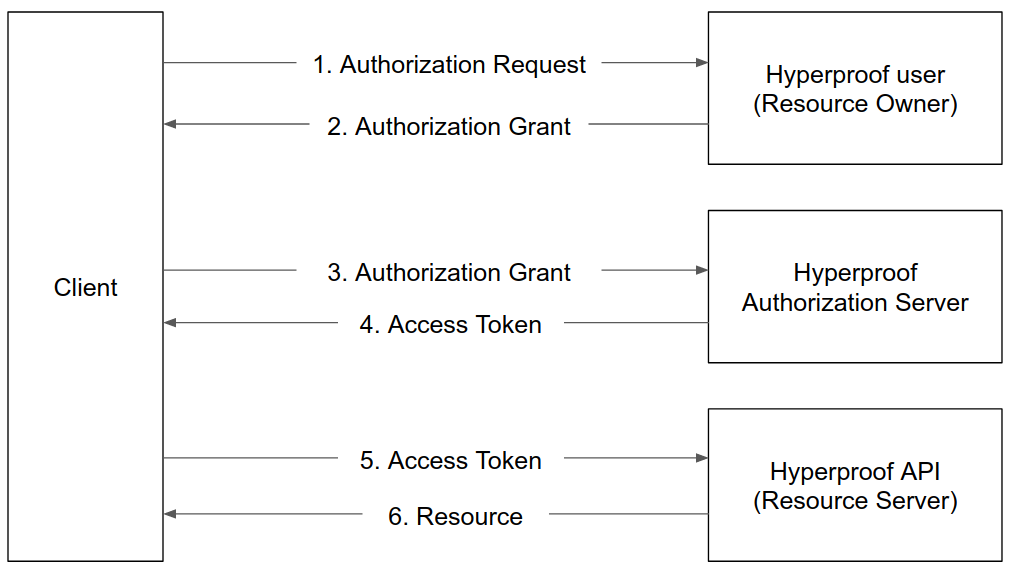
The Client (app) requests authorization from the Hyperproof user to access the user’s information.
The user authorizes the app and the app receives an authorization grant.
The app presents the authorization grant to the Hyperproof Authorization Server to verify that it has received the user’s permission to access user information.
The Hyperproof Authorization Server acknowledges that user has permitted the app with requested access and it sends an access token along with a refresh token back to the app. The access token must be used as a means of authentication while making API calls to the Hyperproof API Server.
An access token is a credential in the form of string that represents the authorization granted to the app. It can be compared with that of an ID card that identifies a person with their level of authority (such as a person’s driving license indicates that the person is authorized to drive).
The app calls the Hyperproof API to access requested resource by including the access token in the request as a means of authentication. When an access token expires, it becomes invalid. In this case, the client must use the refresh token to request another valid access token.
After the Hyperproof API server authenticates the app, it sends back the requested resource in the form of a JSON response. If the authentication fails, an error is thrown stating what caused the error.
Creating an OAuth Client App
To use the authorization code grant type, you must first create a new OAuth client application that supports the flow. To create a new OAuth client application please submit your request using our online form. Once Hyperproof support personnel create your application you will be provided with a client ID and secret that you can use to implement support for the authorization code flow in your app.
OAuth 2.0 End Points
Hyperproof uses the following OAuth 2.0 end points to allow the user to authorize your client application and to subsequently retrieve an access token:
Authorization Redirect:
https://accounts.hyperproof.app/oauth/authorizeRequest Token:
https://accounts.hyperproof.app/oauth/token
All Hyperproof OAuth and API endpoints must be called from the server side of your application. If called from the client side, CORS errors will be thrown.
When a Hyperproof user authorizes an OAuth 2.0 client application, they grant the authorization for a single organization. If the user is a member of more than one organization, they will be asked to select the organization for which they are granting consent.
Getting an Access Token
Obtaining an access token requires a user to authorize the app for the requested scopes. Once the user has authorized the app, the authorization code can be used to obtain an access token.
Step 1: Request User Authentication
Direct the user to https://accounts.hyperproof.app/oauth/authorize. Use the following query parameters in your redirect:
response_type: Response type being requested. The supported authorization workflow requires the value `code`.redirect_uri: URI to handle successful user authorization. Must match one of the redirect URIs that has been specified in your OAuth 2.0 client application.client_id: The unique ID for your OAuth 2.0 client application.scope: One or more OAuth scope values which indicate the required level of access. If multiple scopes are provided, they should be separated by spaces.state: Optional state to include in the request.
Hyperproof currently supports the following scopes:
control.read- Allow an OAuth 2.0 client to read control information.control.update- Allow an OAuth 2.0 client to write control information and to add proof to controls.label.read- Allow an OAuth 2.0 client to read label information.label.update- Allow an OAuth 2.0 client to write label information and to add proof to labels.user.read- Allow an OAuth 2.0 client to read user information.
Example:
https://accounts.hyperproof.app/oauth/authorize?response_type=code&redirect_uri=https%3A%2F%2Fcontoso.com/callback&client_id=7fe5bcb7-9e1a-4163-a197-f2dd6107e491&scope=label.read%20label.update
Note that we are requesting two scopes in this example, label.read and label.update. The two values have been separated by an encoded space (%20).
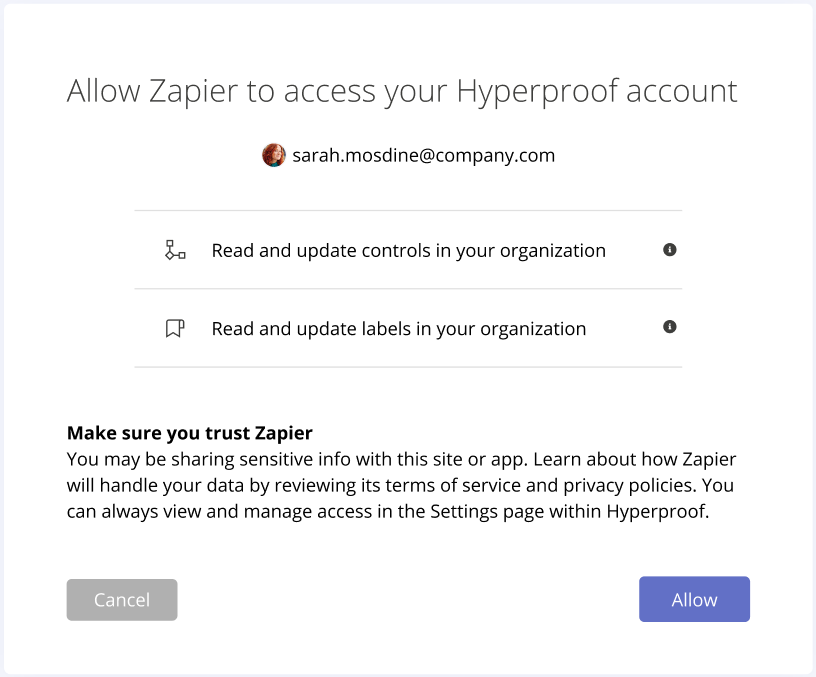
When you issue this request the user will be asked to log in if they are not already authenticated. Once they are authenticated they will be presented with a consent screem similar to this one:
If authorized, the user will be redirected to the redirect_uri with the authorization code in the query parameter:
https://contoso.com/callback?code=6eec5249-93e6-41e2-ba5c-5499e706c9f1
If the optional state parameter was used in the redirect, that state value will be included in the response as well:
https://contoso.com/callback?code=6eec5249-93e6-41e2-ba5c-5499e706c9f1&state=my%20state
Step 2: Request Access Token
Make a post request to https://accounts.hyperproof.app/oauth/token with the following values in the body of the request:
grant_type: The value `authorization_code`code: The authorization code provided by Hyperproof in Step 1.redirect_uri: The redirect URI that was used when the authorization code was obtained.client_id: The unique ID for your OAuth 2.0 client application.client_secret: The secret associated with your OAuth 2.0 client application.
Note the values should be provided using application/x-www-form-urlencoded encoding.
Example:
curl -d "grant_type=authorization_code&code=6eec5249-93e6-41e2-ba5c-5499e706c9f1&redirect_uri=https%3A%2F%2Fcontoso.com/callback&client_id=7fe5bcb7-9e1a-4163-a197-f2dd6107e491&client_secret=12bf4eec72af4f0592745b84a9d03e1e" https://accounts.hyperproof.app/oauth/token
If successful, the response body will be a JSON representation of the user's access token and refresh token:
{
    "access_token": "eyJhbGciOiJIUzI1NiIsInR5cCI6IkpXVCJ9.eyJ2ZXIiOiIxLjAiLCJpc3...",
    "refresh_token": "TncRP3aXMn8i5j11cHD1jf4H4m4",
    "token_type": "bearer",
    "expires_in": 3600,
    "refresh_token_expires_in": 473040000
}
The access token can now be used to make requests to the Hyperproof APIs. Access tokens expire after 1 hour.
Using an Access Token
Make requests to the Hyperproof APIs by sending the access_token value as the Authorization Bearer header.
"Authorization": "Bearer <access_token>"
Example request:
GET
https://api.hyperproof.app/v1/controls/{controlId}This API request retrieves the control identified by controlId from the organization.
Request Headers:
{
    "Authorization": "Bearer eyJhbGciOiJIUzI1NiIsInR5cCI6IkpXVCJ9.eyJ2ZXIiOiIxLjAiLCJpc3..."
}
If successful, the response body will be a JSON representation of the control:
{
    "id": "string",
    "orgId": "string",
    "controlIdentifier": "string",
    "name": "string",
    "description": "string",
    "notes": "string",
    "domainId": "string",
    "domainName": "string",
    "workStatus": "string",
    "owner": {
        "id": "string",
        "email": "string",
        "givenName": "string",
        "surname": "string",
        "profilePhotoName": "string",
        "userId": "string",
        "roleIds": [
            "string"
        ],
        "state": "string"
    },
    "freshnessPolicy": "string",
    "freshForDuration": "string",
    "createdBy": {
        "id": "string",
        "email": "string",
        "givenName": "string",
        "surname": "string",
        "profilePhotoName": "string",
        "userId": "string",
        "roleIds": [
            "string"
        ],
        "state": "string"
    },
    "createdOn": "string",
    "updatedBy": {
        "id": "string",
        "email": "string",
        "givenName": "string",
        "surname": "string",
        "profilePhotoName": "string",
        "userId": "string",
        "roleIds": [
            "string"
        ],
        "state": "string"
    },
    "updatedOn": "string",
    "status": "string",
    "permissions": [
        "string"
    ]
}
Refreshing an Access Token
Access tokens expire in one hour. Once expired, you will have to refresh a user's access token.
Make a POST request to https://accounts.hyperproof.app/oauth/token with the following query parameters:
grant_type: Value `refresh_token`refresh_token: Your refresh token.client_id: The unique ID for your OAuth 2.0 client application.client_secret: The secret associated with your OAuth 2.0 client application.
If successful, the response to this request will look identical to the response when you requested the access token originally:
{
    "access_token": "eyJhbGciOiJIUzI1NiIsInR5cCI6IkpXVCJ9.eyJ2ZXIiOiIxLjAiLCJpc3Mi...",
    "refresh_token": "iTVmyDLIJf9coJGdAfkb11p_3Zs",
    "token_type": "bearer",
    "expires_in": 3600,
    "refresh_token_expires_in": 473040000
}
The response includes a new access_token which is good for one hour. It also includes a new refresh_token. The old refresh_token is now invalid.
Using Proof Key for Code Exchange (PKCE)
The Hyperproof authorization server supports Proof Key for Code Exchange (PKCE) for additional security. To use this feature you need to provide additional query parameters in your authorization requests.
Authorization Request
During the authorization request (Step 1 above) provide the following additional parameters as documented in the PKCE specification:
code_challenge: Generated PKCE code challenge.code_challenge_method: Optional code challenge method. Valid values are `plain` and `S256`. If not provided, defaults to `plain`.
If a code_challenge is specified in the authorization request, Hyperproof will store it securely and then use it to verify the subsequent authorization code exchange request.
Authorization Code Exchange Request
In the authorization code exchange step (Step 2 above) provide the following additional parameters:
code_verifier: The code verifier for the PKCE request that the app originally generated before the authorization request.
Before issuing the access token, Hyperproof will validate the provided code_verifier against the previously provided code_challenge using the code_challenge_method. If verification fails, Hyperproof will return the following error:
Status: 400 (BAD REQUEST)
{
    "error": "invalid_grant",
    "error_description": "Invalid code verifier."
}