OAuth Client Credentials Flow
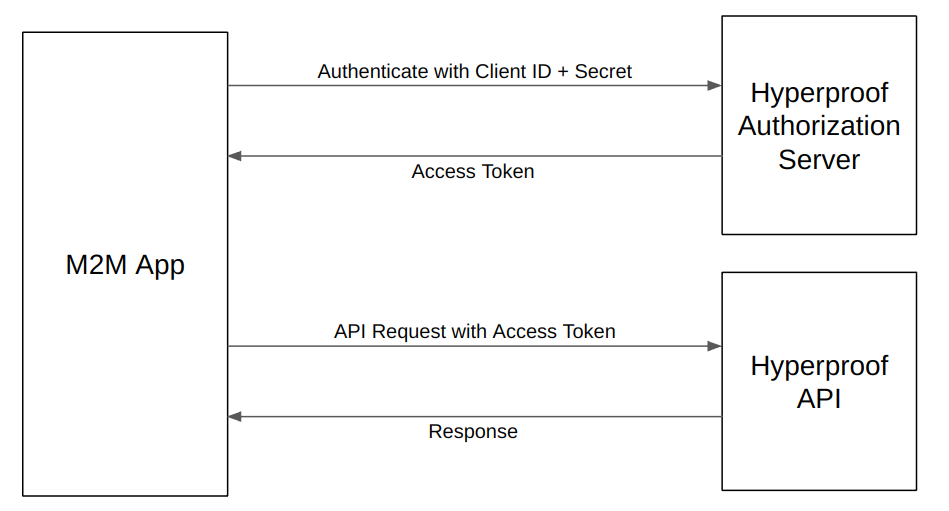
With machine-to-machine (M2M) applications such as CLIs, daemons, or services running on your back-end, the system authenticates and authorizes the app rather than a user. For this scenario, typical authentication schemes like username + password or social logins don't make sense. Instead, M2M apps use the client credentials flow (defined in OAuth 2.0 RFC 6749, section 4.4), in which they pass along their client ID and client secret to authenticate themselves and get a token.
To use the OAuth 2.0 client credentials flow, your app must first pass a API client ID and secret to Hyperproof's Authorization Server. Once your ID and secret have been validated your app will receive an access token that you can use in your API requests.
Creating an API Client
To get started with the client credentials flow, you must first create an API client in your Hyperproof organization. Before you can create an API client, the feature must be enabled in your organization. Your Hyperproof customer service representative (CSR) can enable this for you.
Once the API clients feature is enabled, you will need to decide which type of API client you want to create.
Personal API Client - An API client that inherits your roles and permissions in the organization. When using this type of API client, any items that are created or updated will reflect that they were created or updated by you. Personal API clients are private to you--no one else in the organization has the ability to see your Personal API client.
Service Account API Client - An API client that operates as a service account. Service accounts are security identities with an assigned role in the organization that can be used to access the resources in that organization. Service accounts can be thought of as a "user identity" and in many ways they appear as users in the organization. But no one ever logs into Hyperproof as a service account, and service accounts cannot be owners or assignees on Hyperproof entities.
When using the Service Account API client type to create or update items in Hyperproof, the service account will be recorded as the user who performed the operation. Additionally, Service Account API clients are visible to all administrators in the organization.
Creating a Personal API Client
Click on the Settings link on the bottom of the navigation bar.
Click on the API clients section under Settings.
Make sure the Personal tab is selected at the top of the page.
Click +New to create a new API client.
Specify a name for your client (e.g. "My App")
Select one or more scopes.
Copy the Client ID and Client Secret values and save them on your computer. You will use these values in your app code that access the Hyperproof APIs.
Click Save.
Creating a Service Account API Client
Click on the Settings link on the bottom of the navigation bar.
Click on the API clients section under Settings.
Click on the Service Account tab at the top of the page.
Click +New to create a new API client.
Specify a name for your client (e.g. "My App")
Select one or more scopes.
Specify the role for the service account that will be associated with the API client.
Copy the Client ID and Client Secret values and save them on your computer. You will use these values in your app code that access the Hyperproof APIs.
Click Save.
Getting an Access Token
Hyperproof uses the following OAuth 2.0 end point to allow your app to retrieve an access token using the client credentials flow:
Request Token:
https://accounts.hyperproof.app/oauth/token
To retrieve an access token you must include the grant type, client ID and client secret as form URL encoded values.
cURL Example:
curl -s -d "grant_type=client_credentials&client_id=YOUR_CLIENT_ID&client_secret=YOUR_CLIENT_SECRET" https://accounts.hyperproof.app/oauth/token
If successful, the response body will be a JSON representation of the access token:
{
    "access_token": "eyJhbGciOiJIUzI1NiIsInR5cCI6IkpXVCJ9.eyJ2ZXIiOiIxLjAiLCJpc3...",
    "token_type": "bearer",
    "expires_in": 3600
}
Using an Access Token
Make requests to the Hyperproof APIs by sending the access_token value as the Authorization Bearer header.
"Authorization": "Bearer <access_token>"
Example request:
GET
https://api.hyperproof.app/v1/controls/{controlId}This API request retrieves the control identified by controlId from the organization.
Request Headers:
{
    "Authorization": "Bearer eyJhbGciOiJIUzI1NiIsInR5cCI6IkpXVCJ9.eyJ2ZXIiOiIxLjAiLCJpc3..."
}
If successful, the response body will be a JSON representation of the control:
{
    "id": "string",
    "orgId": "string",
    "controlIdentifier": "string",
    "name": "string",
    "description": "string",
    "notes": "string",
    "domainId": "string",
    "domainName": "string",
    "workStatus": "string",
    "owner": {
        "id": "string",
        "email": "string",
        "givenName": "string",
        "surname": "string",
        "profilePhotoName": "string",
        "userId": "string",
        "roleIds": [
            "string"
        ],
        "state": "string"
    },
    "freshnessPolicy": "string",
    "freshForDuration": "string",
    "createdBy": {
        "id": "string",
        "email": "string",
        "givenName": "string",
        "surname": "string",
        "profilePhotoName": "string",
        "userId": "string",
        "roleIds": [
            "string"
        ],
        "state": "string"
    },
    "createdOn": "string",
    "updatedBy": {
        "id": "string",
        "email": "string",
        "givenName": "string",
        "surname": "string",
        "profilePhotoName": "string",
        "userId": "string",
        "roleIds": [
            "string"
        ],
        "state": "string"
    },
    "updatedOn": "string",
    "status": "string",
    "permissions": [
        "string"
    ]
}